Welcome to the RMU Blackboard Student Support website!
This site contains documentation that can be used to assist students with the most common Blackboard tasks.
To access Blackboard, please navigate to blackboard.rmu.edu
To ensure the best Blackboard experience, the preferred and recommended web browser is Google Chrome. Please navigate to www.google.com/chrome to download the most recent version of Chrome (if needed).
Respondus LockDown Browser needs to be installed on your computer prior to taking an exam. Please download the RMU customized installer here.
Please Note: Respondus LockDown Browser is for Windows, MacOS, and Chromebooks. Respondus Monitor requires the use of a webcam in order for the exam to begin.
Browser Plugins
The following web browser plug-ins must be installed on your machine for Blackboard to work properly. Please follow the links provided and install the plugin-ins on your computer.
- Adobe Acrobat Reader: http://get.adobe.com/reader/
- Java: http://www.java.com/en/
If this documentation does not provide the level of assistance needed, please call 412-397-2211 and speak to one of our IT Help Desk technicians.
Logging into Blackboard
1. Open your web browser.
2. In the address bar, enter: blackboard.rmu.edu <enter>
3. If prompted, click the login with Single Sign On (SSO) button. Single Sign On is used to access Blackboard.
Your Blackboard username and password are the same as your RMU username and password.
4. The Blackboard Home Page displays.
 Logging In / Changing Your Blackboard Password
Single Sign On (SSO)
Single Sign On technology is used to access Blackboard LMS. If you need to reset your password, please visit rmu.edu/passwordchange or call the RMU IT Help Desk (412-397-2211). Your Blackboard username and password are the same as your Sentry Secured username and password.
Blackboard General Help for Students
Blackboard General Help for Students (YouTube)
- Completing an Exam
-
Purpose Statement
Instructors utilize online exams in place of standard written exams. Exams in Blackboard contain several different question types such as Multiple Choice, True/False, Fill-In-The_blank, Multiple Answer, Essay, and Matching.1. Click on the name of the Exam.

2. Read the instructions and click "Continue".
3. Check your answers and click "Save and Submit".
4. Click "OK" to confirm your submission.
5. Click "OK" to view your results.
- Creating and Editing Your Blackboard Profile
-
Purpose Statement:
The purpose of this document is to provide students and faculty with step-by-step instructions on how to create and edit a profile in Blackboard. This profile shows key information about the student and faculty and an image. This helps create a sense of personalization in an online environment.If you only wish to edit your Blackboard profile, proceed to Step 13.
This procedural document assumes that users are logged in to Blackboard.
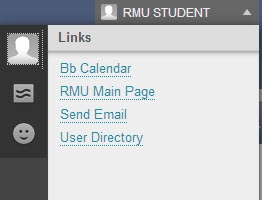
1. In the upper-right corner of the screen, click the Global Navigation drop-down menu.
The Global Navigation drop-down menu displays.
2. Click the Edit My Blackboard Profile button. This button is denoted by the Grey head/profile picture in the upper-left corner of the Global Navigation menu. If you are editing your profile, please skip to Step 13, otherwise, follow the remainder of the steps.
IMPORTANT NOTE: If you are creating your profile, the image will be a grey head. If you are editing your profile, the image will be the image you selected for your profile.
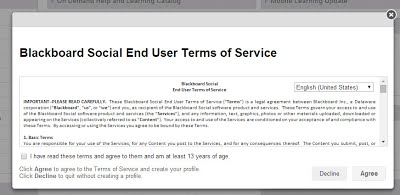
The Blackboard Social End User Terms of Service screen displays.
3. Click to select the I have read these terms and agree to them and am at least 13 years of age checkbox.
4. Click the Agree button.
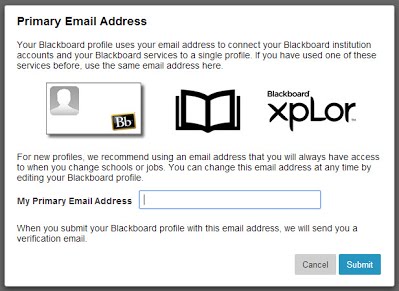
The Primary Email Address screen displays.
5. In the My Primary Email Address field, enter your RMU email address.
IMPORTANT NOTE: You can only use your RMU email address. You cannot use any other email address.
6. Click the Submit button.
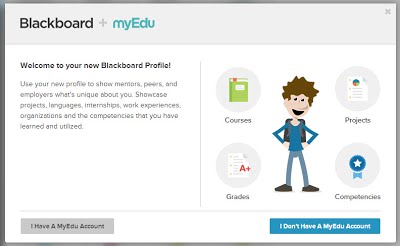
The Blackboard + myEdu screen displays.
7. Click the I Don't Have A MyEdu Account button.
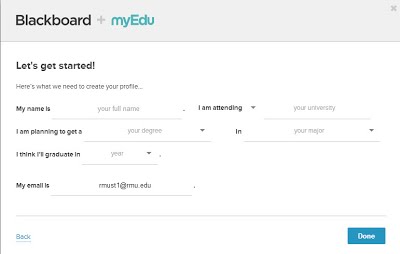
The Let's Get Started page displays.
8. Fill out the form in its entirety.
9. When the form is completed, click the Done button.
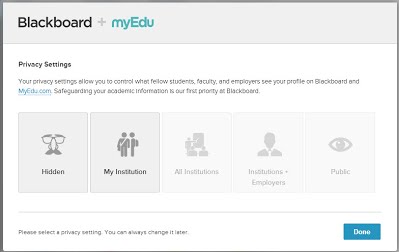
The Privacy Settings screen displays.
10. Click the My Institution button. This share your profile with just those at RMU.
11. Click the Done button.
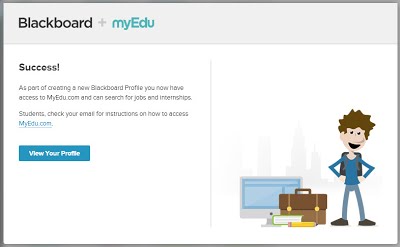
The Success! screen displays.
12. Click the View Your Profile button. The Blackboard home page displays.
13. Click the Global Navigation drop-down menu. The Global Navigation drop-down menu displays.
14. Click the Edit My Blackboard Profile button. This button is denoted by the Grey head/profile picture in the upper-left corner of the Global Navigation menu.
Your Blackboard profile displays.
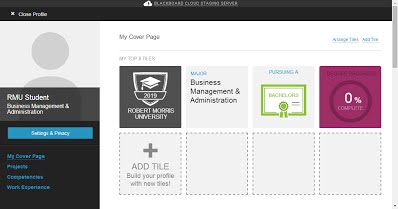
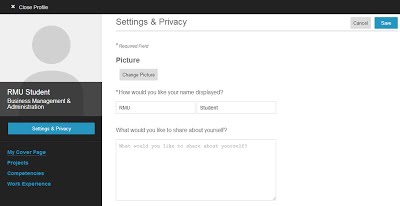
15. To edit your profile picture and add additional information to your profile, click the Settings & Privacy button.
The Settings & Privacy screen displays.
16. To update your profile picture, click the Change Picture button.
17. If desired, in the How would you like your name displayed? field, modify the way your name displays in your profile.
Important Note: This only affects your profile, not how your name is displayed in your courses.
18. To add additional information to your profile, enter text in the What would you like to share about yourself? text area.
19. After all changes have been made, click the Save button.
- Creating Entries
-
- Creating Blog Entries
-
Purpose Statement
This work instruction provides detailed instructions on how to create a blog entry. This work instruction assumes that the user is logged in to Blackboard, inside of an active course, and ready to create the blog entry.1. Click the link for the blog.

IMPORTANT NOTES
- Blogs can be identified by the icon to the left of the link. This icon is a piece of paper with a bubble callout.
- If the link to Blogs does not exist within the week, click the Blogs link in the left-hand navigation pane or access Blogs from the Tools link in the left-hand navigation pane.
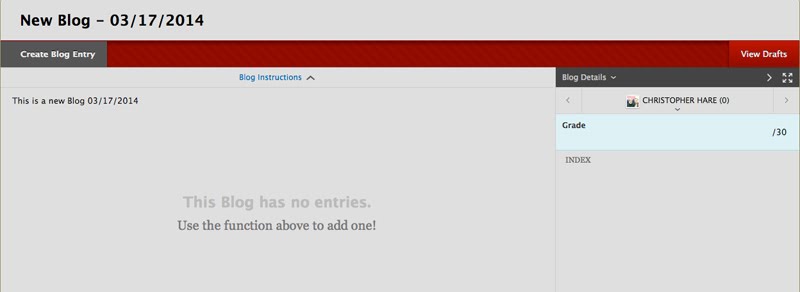
2. The New Blog page displays.
3.
 Click the Create Blog Entry button.
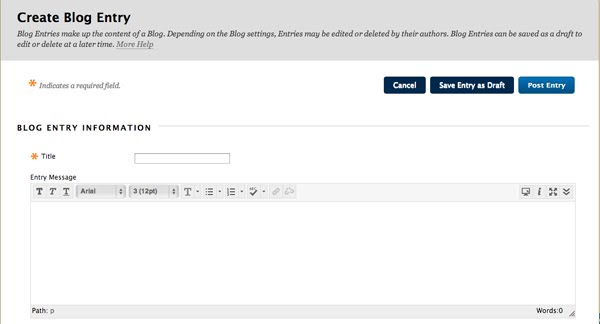
4. The Create Blog Entry Page displays.
5. In the Title field, enter a title for the blog entry.
6. In the Entry Message text area, enter the text for the blog entry.
IMPORTANT NOTE: If desired, files can be attached to the blog entry by clicking the Browse My Computer button in the Blog Entry Files section.
7.
 Click the Post Entry button. The blog is successfully submitted.
 - Creating Journal Entries
-
Purpose Statement
This work instruction provides detailed instructions on how to create a journal entry. This work instruction assumes that the user is logged in to Blackboard, inside of an active course, and ready to submit an assignment.1. Click the link for the journal.

IMPORTANT NOTES
- Journals can be identified by the icon to the left of the link. This icon is a notebook with a capital J on the cover.
- If the link to Journal does not exist within the week, click the Journals link in the left-hand navigation pane or access Journals from the Tools link in the left-hand navigation pane.
The Create Journal Entry page displays.
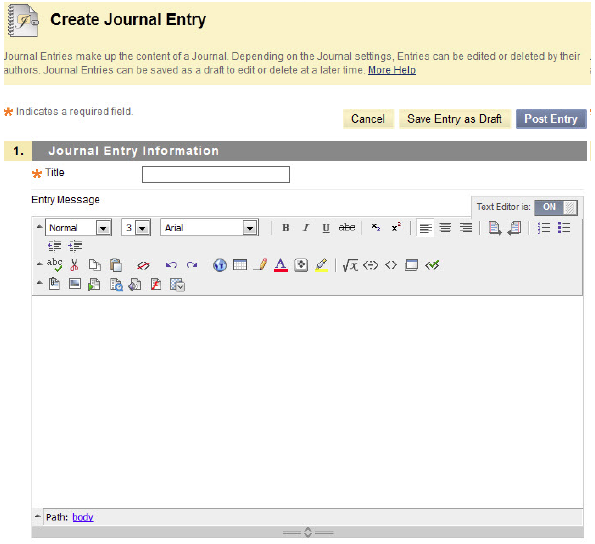
2. In the Title field, enter a title for the journal.
3. In the Entry Message text area, enter or copy-and-paste your journal entry.
IMPORTANT NOTE: If desired, files can be attached to the journal entry by clicking the Browse My Computer button in the Journal Entry Files section.
4.
 Click the Post Entry button. The journal is successfully submitted for grading.
 - Creating Wiki Entries
-
Purpose Statement
This work instruction provides detailed instructions on how to create a journal entry. This work instruction assumes that the user is logged in to Blackboard, inside of an active course, and ready to submit an assignment.1. Click the link for the wiki.

IMPORTANT NOTES
- Wikis can be identified by the icon to the left of the link. This icon is five collated pieces of paper.
- If the link to the Wiki does not exist within the week, click the Wikis link in the left-hand navigation pane or access Wikis from the Tools link in the left-hand navigation pane.
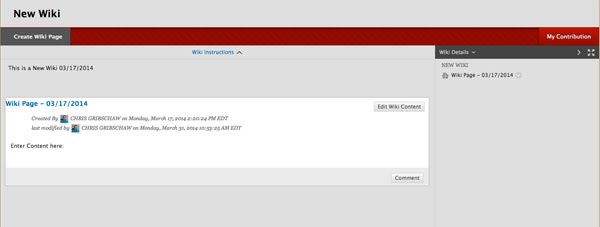
The Wiki page displays.
2.
 Click the Create Wiki Page button.
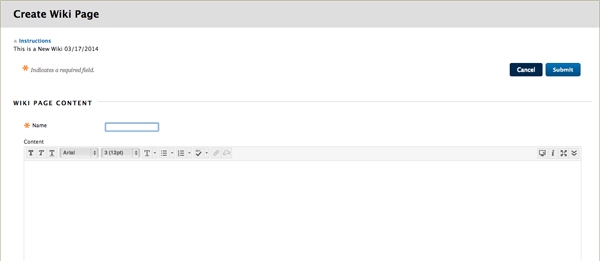
The Create Wiki Page displays.
3. In the Name field, enter a title for the wiki page.
4. In the Content text area, enter the text for the wiki page.
IMPORTANT NOTE: If desired, files can be attached to the blog entry by clicking the Browse My Computer button in the Blog Entry Files section.
5.
 Click the Post Entry button. The wiki page is successfully submitted.
- Discussion Responses
-
- Responding to a Discussion
-
Purpose Statement
The purpose of this document is to walk an instructor through the process of responding or creating their own thread in a Discussion in Blackboard.1. The first step is to access the Discussion. Starting at the Home Page from within the course, Access the Discussion tab from the Main Course Menu. This is located on the left hand side of the screen. Click on Discussion Tab in order to enter.
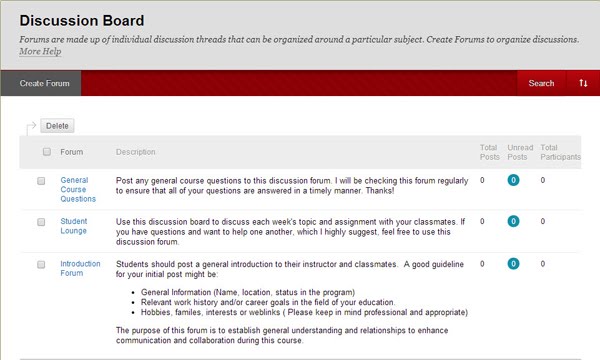
2. The following picture represents a view of the Discussion Area. All Discussions in a course can be seen from this view. In this example we only have one discussion.
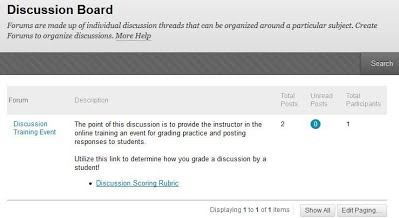
3. When you Mouse Over, or place your mouse, on the discussion, you can click on it to enter the actual discussion threads.
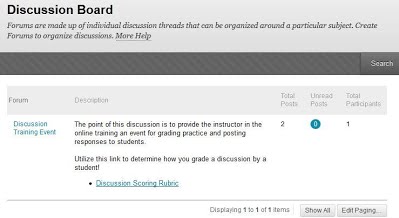
4. In order to create your own thread, or response, the original discussion question, Click on the Create Thread button highlighted below.
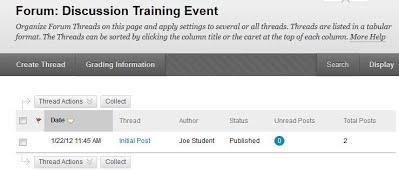
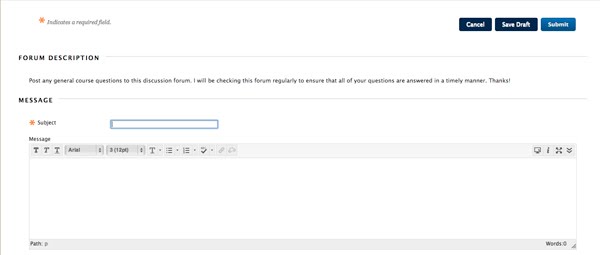
5. Once you have opened the View User Activity shown below, you will find (2) key areas:
1. The Subject area is where you would place a titled for your response.
2. The Message area is where you would type the text for your for posting to the forum.IMPORTANT NOTES:
- When responding to discussions there may be times that files (images, documents, etc.) must be attached to the post. To do this, click the Paper Clip icon in the Visual Editor toolbar.
- If the Paper Clip icon is not visible, click the Show More icon.
- As with most technology, Blackboard can fail. To ensure that posts are constantly saved, click the Save Draft button. This will save your work in case of Blackboard issues.
6. Once you have composed your response, do not forget to hit the Submit button in the upper or lower right hand corners of this view in order to save and make your work visible.
- When responding to discussions there may be times that files (images, documents, etc.) must be attached to the post. To do this, click the Paper Clip icon in the Visual Editor toolbar.
- Responding to a Classmate in a Discussion
-
Purpose Statement
The purpose of this document is to walk a student through the process of responding to a classmate in a Discussion in Blackboard.1. The first step is to access the Discussion. Starting at the Home Page from within the course, Access the Discussion tab from the Main Course Menu. This is located on the left hand side of the screen. Click on Discussion Tab in order to enter.
2. The following picture represents a view of the Discussion Area. All Discussions in a course can be seen from this view. In this example we only have one discussion.
3. When you Mouse Over, or place your mouse, on the discussion, you can click on it to enter the actual discussion threads.
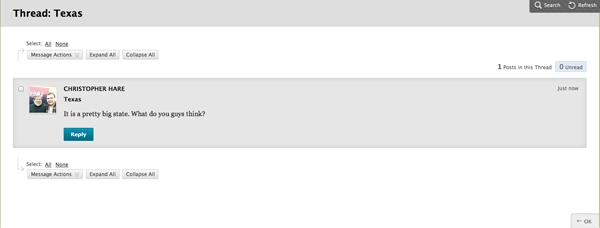
4. In order to begin reading and responding to the threads, simply click on a thread to expand it to your view.
- Hiding Older Courses from the Current and Historical Courses Modules
-
Purpose Statement:
The purpose of this video demonstration is to show students how to hide older courses from both the Current Courses module on the Blackboard Home Page.
- Sending Emails
-
- Sending an Email from the Home Tab
-
Purpose Statement
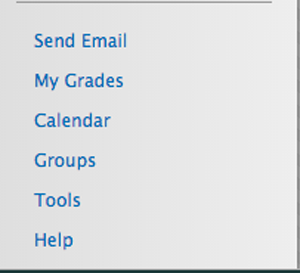
This work instruction provides detailed instructions on how to send an email message from the Home tab. This work instruction assumes that the user is logged in to Blackboard and on the Home tab.1. From the Tools widget, click the Send Email link.
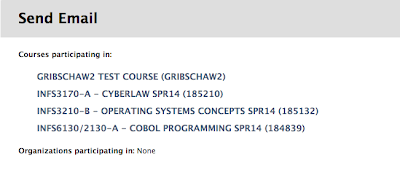
The Send Email page displays.
2. Click the Course link for the course from which you want to send an email.
The Send Email page displays.
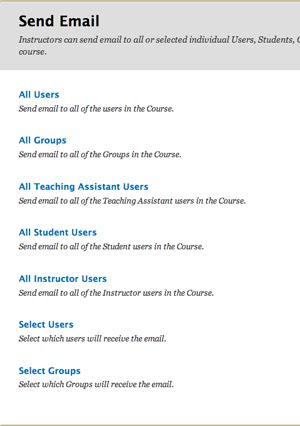
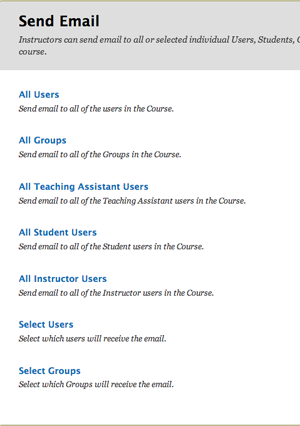
IMPORTANT NOTE: Please read about each email that can be sent before clicking the link to send an email to that person or people.
3. Click the link for the type of email to be sent. In most cases, the link to click is the All Instructor Users link.
The All Instructor Users page displays.
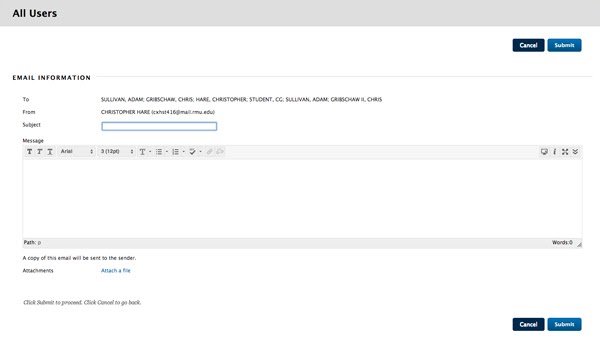
4. In the Subject field, enter a subject for the message.
5. In the Message field, type the message to be sent.
6.
 Click the Submit button to send the message.
A confirmation message displays at the top of the screen.

- Sending an Email from Within Courses
-
Purpose Statement
This work instruction provides detailed instructions on how to send an email message from within a course. This work instruction assumes that the user is logged in to Blackboard and in an active course.From the left-hand Navigation Pane, click the Send Email link.
The Send Email page displays.
IMPORTANT NOTE: Please read about each email that can be sent before clicking the link to send an email to that person or people.
2. Click the link for the type of email to be sent. In most cases, the link to click is the All Instructor Users link.
The All Instructor Users page displays.
3. In the Subject field, enter a subject for the message.
4. In the Message field, type the message to be sent.
5.
 Click the Submit button to send the message.
A confirmation message displays at the top of the screen.

- Submitting Assignments
-
- Submitting a SafeAssign Assignment
-
Purpose Statement
This work instruction provides detailed instructions on how to submit a SafeAssign assignment. This work instruction assumes that the user is logged in to Blackboard, inside of an active course, and ready to submit the assignment.1. Click the View/Complete link underneath the SafeAssign assignment.

IMPORTANT NOTE: SafeAssign assignments can be identified by the icon to the left of the link. This icon is a green piece of paper with a green checkmark.
The Upload SafeAssignment page displays.

2. To leave any comments or a note for the instructor, enter them in the Comments field. DO NOT copy-and-paste your paper in this field.
3.
 Click the Browse button to attach the submission.
4. Browse the computer and select the file to be submitted.
Important Note: SafeAssign will only accept files with doc, docx, odt, txt, rtf, pdf, and html file extension. Please ensure that the file being submitted has one of those file extensions.
5. From the Global Reference Database, click to select the I agree to submit my paper to the Global Reference Database checkbox.

6.
 Click the Submit button. The SafeAssign assignment is successfully submitted for grading.
 - Submitting a Turnitin Assignment
-
Purpose Statement
This work instruction provides detailed instructions on how to submit a Turnitin assignment. This work instruction assumes that the user is logged in to Blackboard, inside of an active course, and ready to submit the Turnitin assignment.Click the View/Complete link.

IMPORTANT NOTE: Turnitin assignments can be identified by the icon to the left of the link. This icon is a piece of paper with a lower-left corner that looks like an arrow.
The Course Homepage and Assignment Inbox page displays.

2. From the Assignment Inbox section, click the Submit button.
The Submit Paper page displays.
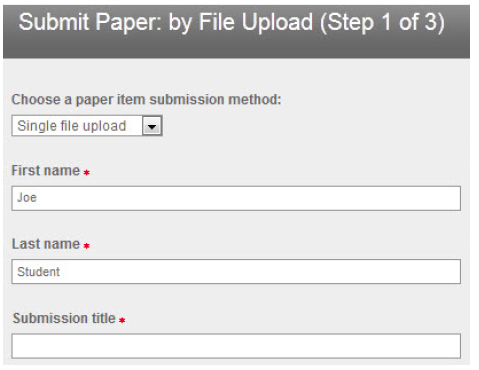
3. In the Submission Title textbox, enter a title for the submission. Use a naming convention similar to LastNameFirstName_AssignmentTitle.
4.
 Click the Browse button.
5. Browse the computer and select the file to be submitted.
6.
 Click the Upload button. The assignment is successfully submitted to Turnitin for review and grading.
 - Submitting an Assignment
-
Purpose Statement
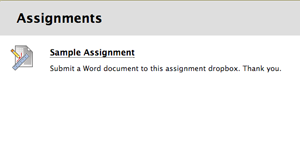
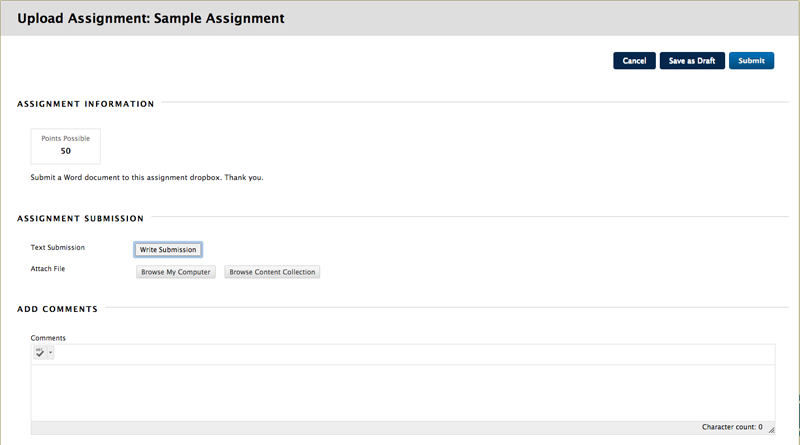
This work instruction provides detailed instructions on how to submit an assignment. This work instruction assumes that the user is logged in to Blackboard, inside of an active course, and ready to submit an assignment.1. Click the link for the assignment.
IMPORTANT NOTE: Assignments can be identified by the icon to the left of the link. This icon is a piece of paper with a pencil and ruler.
The Upload Assignment page displays.
2.
 From the Assignment Materials section, click the Browse My Computer button.
3. Browse the computer and select the file to be submitted.
4.
 Click the Submit button. The assignment is successfully submitted for grading.
- Using the Forgot Your Password Link
-
If you do not know your password there are two options for resetting it.
Option 1 is to visit https://rmu.edu/password and use the online form to change it.
Option 2 is to call the RMU Helpdesk at 412-397-2211 for assistance with resetting it.
IMPORTANT NOTE: Your RMU account must be active to log in to Blackboard. When you change your RMU password, your Blackboard password will also change.
- Viewing Grades
-
- Viewing Grades from the Home Tab
-
Purpose Statement
This work instruction provides detailed instructions on one of two ways to view grades in Blackboard. This work instruction assumes that the user is logged in to Blackboard and on the Home tab.1. From the Tools widget on the left side of the page, click the My Grades link.
2. The My Grades page displays.
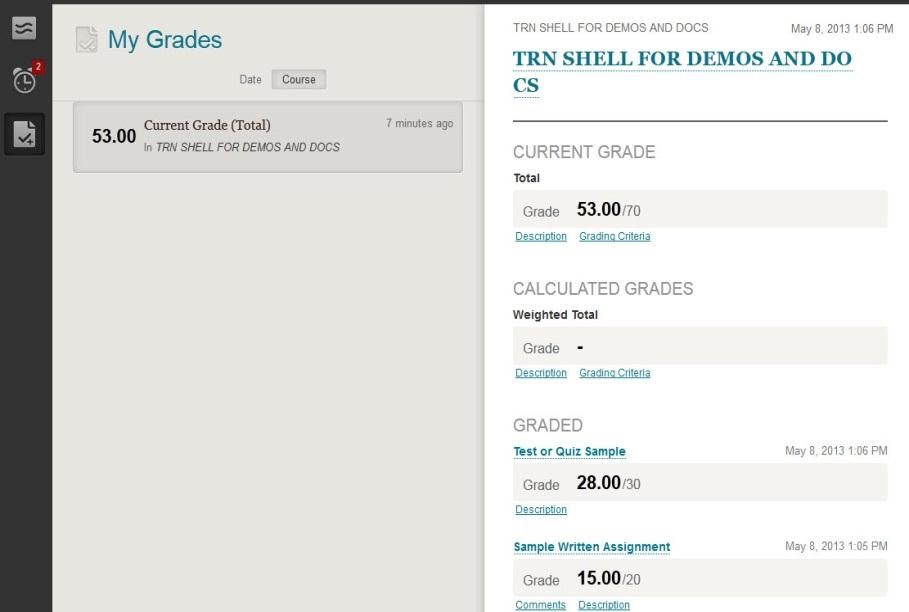
3. Click the Course Name link, in the right column, to view the grades for that course. The grades for the selected course display to the right.
4. To view additional details about each grade, click the grade number under each assignment.
The View Attempts page displays.
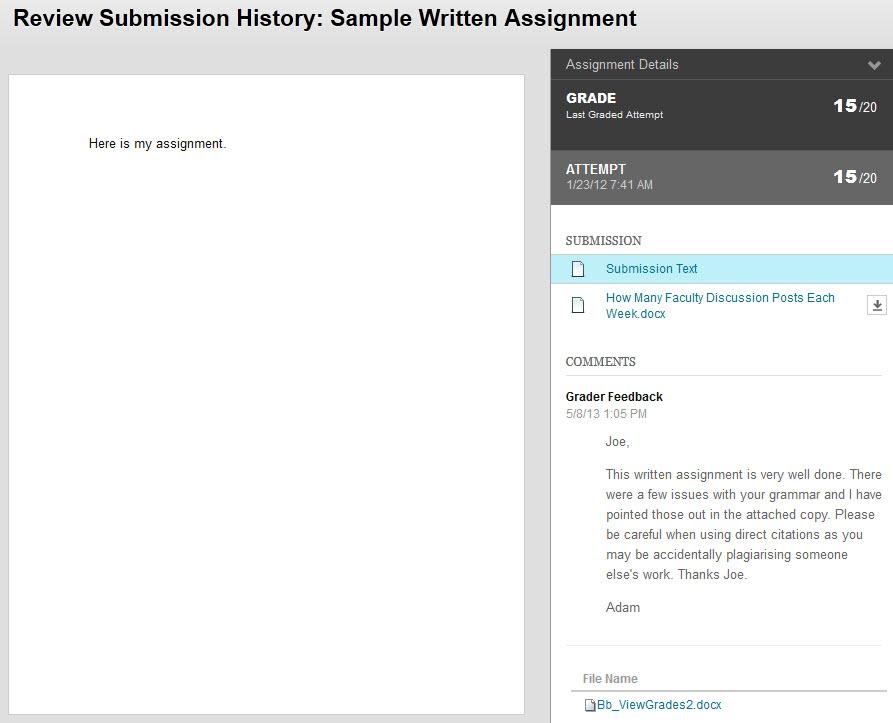
For Written Assignments/Dropbox Assignments and Discussions, the instructors feedback, score, and any attached files display on this screen. For Quizzes, Test, and Exams with essay questions, students must click the numerical score (from the Grade Details page) to view feedback on essay questions.
5. To exit the My Grades screen, click the Home tab.
- Viewing Grades from Within Courses
-
Purpose Statement
This work instruction provides detailed instructions on the second of two ways to view grades in Blackboard. This work instruction assumes that the user is logged in to Blackboard and inside of an active course.1. From the left-hand Navigation Pane, click the My Grades link.
2. The My Grades page displays.

The My Grades page displays all of the grades entered by the instructor, including any comments on the assignment.
3. To view additional details about each grade, click the grade number under each assignment.
The Grade Details page displays.
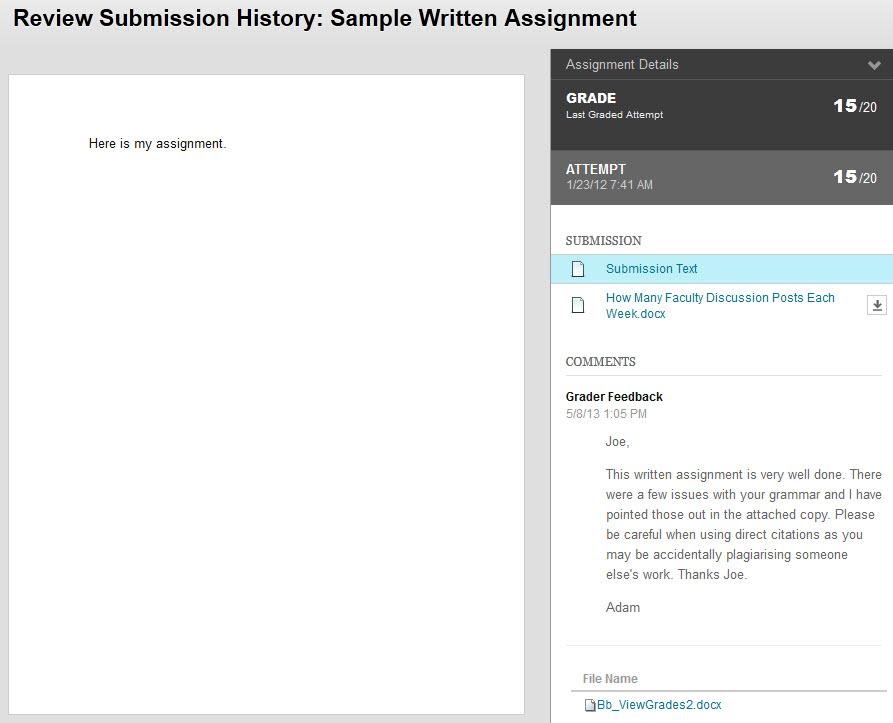
For Written Assignments/Dropbox Assignments and Discussions, the instructors feedback, score, and any attached files display on this screen. For Quizzes, Test, and Exams with essay questions, students must click the numerical score (from the Grade Details page) to view feedback on essay questions.
4. Click any of the links in the left-hand Navigation pane to exit the My Grades area.
Technical Support for Blackboard LMS
Phone: (412) 397-2211 Email: help@rmu.edu


